Wednesday 19 December 2018

MINUTE BLACKENED SALMON

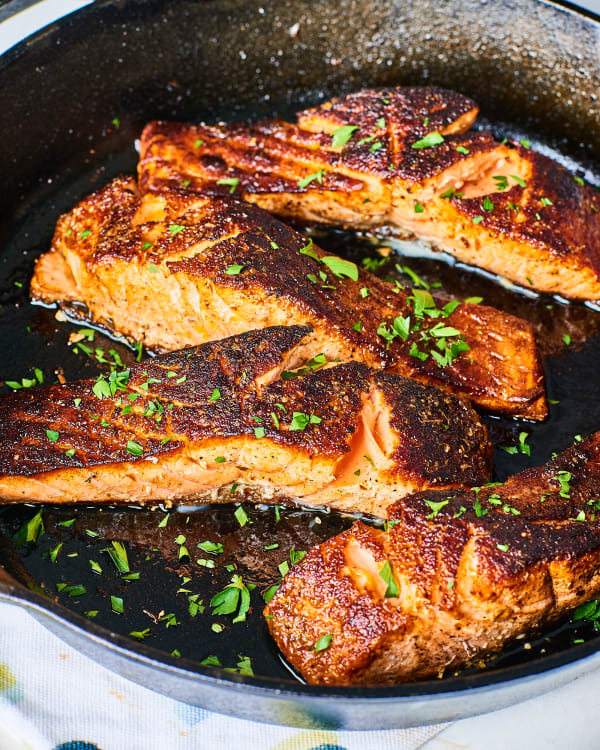
Minute Blackened Salmon

Serves 4
Prep time: 5 minutes ; cooking time: 8 minutes to 10 minutes
  • 1 tablespoon plus 1 teaspoon sweet paprika
  • 1 teaspoon garlic powder
  • 1 teaspoon dried oregano
  • 1 teaspoon kosher salt
  • 3/4 teaspoon cayenne pepper
  • 2 tablespoons olive oil
  • 4 (6-ounce) skin-on salmon fillets
  • 1 medium lemon, cut into wedges
Place the paprika, garlic powder, oregano, salt, and cayenne in a shallow bowl or plate and stir to combine. Press the flesh side of each salmon fillet into the seasoning to evenly coat it. Alternatively, you can pat the seasoning mixture evenly onto the flesh side of each salmon fillet.
Heat the oil in a large nonstick or cast iron skillet over medium until shimmering. Add the fillets, skin-side up, and cook until blackened, about 3 minutes. Flip the fillets and continue to cook until cooked through to your liking, 5 to 7 minutes depending on the thickness of your fillets. If the skin is starting to burn before the fillets are cooked, turn the heat down to medium-low. If the fillets are extra thick (1 1/2 to 2-inches thick in the middle), you may need to turn the fillets on their sides for a minute on each side to cook them through. An instant-read thermometer into the middle of the thickest fillet should register 120°F to 130°F for medium-rare or 135°F to 145°F for more well-done. Transfer the fillets to individual plates and serve with lemon wedges.

Friday 18 March 2016

Marinara Pasta Sauce dedicated to lovely carol karendi amazing super dinner for her


How To Make Marinara Pasta Sauce


Serves 4 to 6

What You Need

Ingredients
1 tablespoon olive oil
1 small yellow onion, finely diced
2 to 3 cloves garlic, minced
1 (28-ounce) can whole peeled tomatoes
1 bay leaf
1/4 teaspoon salt
Fresh thyme, basil, oregano, or other herbs
Parmesan cheese, to garnish, optional
Cooked pasta, to serve
Equipment
Sauce pot or high-sided skillet
Spatula

Instructions

  1. Sauté the onions and garlic: Warm 1 tablespoon of olive oil over medium-high heat. Add the onions and sauté until softened and translucent, 5 to 7 minutes. Stir in the garlic and sauté until fragrant, about 30 seconds.
  2. Crush the tomatoes and add to the pan: Add the tomatoes and their juices to the pan with the onions. Crush the tomatoes in your hand as you add them, or smash them against the sides of the pan with your spatula. Alternatively, you can cut the tomatoes with kitchen shears while they're still in the pan.
  3. Add the bay leaf and fresh herbs: Add the bay leaf, salt, and fresh herbs like thyme and oregano to the pan with the sauce. If you're adding basil, wait to add it until the end of cooking.
  4. Simmer for about 20 minutes: Bring the sauce to a rapid simmer, then lower the heat to medium-low to maintain a gentle simmer. Continue simmering until the sauce is slightly reduced and thickened, about 20 minutes.
  5. Meanwhile, cook the pasta: While the sauce is simmering, cook the pasta, toss together a salad, or finish any other meal components.
  6. Serve the sauce: Remove the bay leaf and any herb stems. Serve the sauce immediately over pasta with a sprinkle of parmesan cheese. Leftovers will keep refrigerated for about a week or can be frozen for up to 3 months.

Recipe Notes

  • Dress it up! Dress up this simple sauce with a splash of red wine or balsamic vinegar, throw a few more veggies in with the onions, or cook up some ground beef or mushrooms for a more substantive sauce.


How To Cook Pork Chops in the Slow Cooker


How To Cook Pork Chops in the Slow Cooker


Makes 3 to 6 chops

What You Need

Ingredients
3 to 6 bone-in pork chops (3/4- to 1-inch thick, around 1/2 pound each) — preferably blade, shoulder, or sirloin chops; rib chops are second best
For the brine, optional:
1/2 cup kosher salt
8 cups water
Aromatics like bay leaf, whole peppercorns, and other spices
For the slow-cooker dish:
Chopped vegetables and fruits, enough to form a layer on the bottom of the slow cooker — like apples, Asian pears, onions, carrots, celery, fennel, potatoes, sauerkraut
1/4 cup cooking liquid, like broth, cider, hard cider, white wine, or water
Equipment
Shallow dish, if brining
Paper towels
Skillet, if searing your chops
Cooking utensils
6-quart or larger slow cooker

Instructions

  1. Brine your pork chops, optional: Brining seasons the meat throughout and provides some insurance against overcooking. Stir together the salt and the water until the salt dissolves. (You can also warm the water in the microwave to make this easier, but wait for the water to cool before continuing.) Place the chops in a shallow dish and pour the brine over them. The chops should be submerged; if not, make additional brine solution. Cover the dish and refrigerate for at least 15 minutes or up to 4 hours.
  2. Season with salt and pepper: If you brined your pork chops, rinse them under running water, then pat them dry with paper towels. If you didn't, just remove from their package and pat dry. Either way, season both sides with salt and pepper.
  3. Sear your chops, optional: Searing adds good flavor to the overall dish, but if you're in a rush, you can skip this step. If you do sear the meat, you can also quickly sauté the onions or other vegetables going into the dish and then deglaze the pan with the cooking liquid. Add an extra splash of the cooking liquid to the pot to compensate for the liquid that evaporated during deglazing.
  4. Add a layer of vegetables to the slow cooker: Scatter the vegetables or fruits you've chosen over the bottom of the slow cooker. They should form a single layer.
  5. Layer the chops on top: It's OK to overlap the chops slightly, but don't stack them on top of each other.
  6. Pour the cooking liquid over top: Pour the cooking liquid, or the liquid left from deglazing your pan, over the chops. If you sautéed any vegetables, tuck some of them below the chops and scatter the rest on top.
  7. Cook for 2 to 6 hours on LOW: At around 2 hours, your pork chops will be cooked through (145°F) and have a texture similar to chicken breast — tender, but firm. Between 3 to 6 hours, the chops will have a texture closer to pulled pork; it will be easy to cut with a fork and will pull easily from the bone. (The first time you make slow cooker pork chops, check the chops every so often to see how they're cooking; after this first batch, you'll know exactly how much cooking time to plan for going forward to make your ideal pork chops.)
  8. Serve with the vegetables and cooking liquid: Serve straight from the slow cooker or transfer everything to a serving dish. Spoon the cooking liquid over top of everything.

Recipe Notes

  • Leftovers: These are not my favorite chops to reheat and serve the next day; I find that they're just a bit too dry and tough at that point. If you do end up with leftovers, I recommend pulling them into shreds and using them in burritos, tacos, soups, and the like.


Slow Cooker Cranberry Pork Chops


Slow Cooker Cranberry Pork Chops


Serves 4 to 6
4 boneless pork chops, about 1/2-inch thick (2 to 3 pounds total)
2 tablespoons unsalted butter
1/2 cup chopped onion, from 1 small onion
1/4 cup chopped celery, from 1 large celery rib
1 clove garlic, minced
1 teaspoon coarse kosher salt
1 cup fresh or frozen cranberries
1/2 teaspoon dried thyme
1/4 teaspoon freshly ground black pepper
2 tablespoons brown sugar
1/4 cup chicken or vegetable broth, or white wine — added to the slow cooker
* Optional Step: Heat a large skillet over high heat and sear the pork chops for 2 minutes on each side. Immediately place them in the fridge or freezer to cool completely. (See Recipe Note and Tester's Notes for thoughts on food safety and searing ahead.)
In a large skillet, melt the butter over medium heat. Add the onion, celery, and garlic, and cook, stirring, until the vegetables are tender. Sprinkle with the salt as it cooks. Set the mixture aside to cool completely.
Place the cooled sautéed vegetables, cranberries, pork chops, pepper, thyme, and brown sugar Seal the bag, squeezing out as much air as possible. Massage the bag to distribute the ingredients evenly.

Freezing Instructions

Freeze the bag flat in the freezer for up to 3 months.

Thawing & Cooking Instructions

Thaw the pork chops on a tray or dish in the refrigerator. On the morning of the day you plan to serve this dish, empty the contents of the bag into a 4-quart slow cooker and add 1/4 cup broth or wine. Cook on LOW for 6 to 8 hours, or until the pork chops are cooked through.

Recipe Notes

  • The step of searing the pork chops is optional, as some cooks are not comfortable freezing browned meat.


Saturday 20 February 2016

Slow Cooker Chicken Tikka Masala

\

Slow Cooker Chicken Tikka Masala


Serves 4 to 6
1 to 1 1/2 pounds boneless, skinless chicken thighs
1 large onion, diced
3 cloves garlic, minced
1-inch piece whole ginger, peeled and grated
2 tablespoons tomato paste
1 to 2 tablespoons garam masala
2 teaspoons paprika
2 teaspoons kosher salt
1 (28-ounce) can diced tomatoes
3/4 cup heavy cream or coconut milk
Fresh cilantro, chopped
2 cups cooked rice, to serve
Cut the chicken thighs into bite-sized pieces and transfer them to a 3-quart or larger slow cooker. Stir in the onion, garlic, ginger, tomato paste, 1 tablespoon of garam masala, paprika, and kosher salt until the chicken is evenly covered with spices. Stir in the diced tomatoes with their juices.
If you have the time: Marinate the chicken in 1/2 cup yogurt for up to 6 hours. Shake to remove excess yogurt before transferring to the slow cooker.
→ If you have the time: Sauté the onions and garlic in a little olive oil over medium-high heat in a skillet until softened, then stir in the ginger, tomato paste, and spices until fragrant. Transfer to the slow cooker with the chicken and diced tomatoes. This will give your tikka masala more depth of flavor.

Cover the slow cooker and cook for 4 hours on high or 8 hours on low. Fifteen minutes before the end of cooking, stir in the heavy cream. If you prefer a thicker sauce, leave the slow cooker uncovered for the last 15 minutes. Taste and add more garam masala or salt to taste.
Serve over rice with fresh cilantro sprinkled over the top of each serving. The tikka masala can be refrigerated for 3 to 4 days or frozen for 3 to 4 months.

Recipe Notes

  • Chicken breasts can be substituted for the thighs, though I find thighs hold up better over the long cooking and breasts tend to fall into shreds. Still delicious, though!
  • For a little of that smoky, tandoori flavor, try using smoked paprika and roasted tomatoes.
  • Here's my favorite method for cooking basmati rice in about 20 minutes:


How To Make Meatballs in the Slow Cooker

Slow Cooker Meatballs 

How To Make Meatballs in the Slow Cooker


Serves 4 to 6

What You Need

Ingredients

For the tomato sauce:
1 28-ounce can crushed tomatoes
1/2 large yellow onion, chopped small
1/2 teaspoon salt
1 bay leaf
For the meatballs:
1/2 cup whole or 2% milk
1/2 cup breadcrumbs or panko crumbs
1 large egg
1 teaspoon salt
1/2 cup grated Parmesan cheese
1/4 cup parsley, finely chopped
1 pound ground beef, pork, lamb, or a mix
1/2 large yellow onion, chopped small
1 clove garlic, minced
Equipment
6-quart slow cooker or larger

Instructions

  1. Make the sauce: Combine the crushed tomatoes, onions, salt, and bay leaf in the bowl of the slow cooker. Stir to combine.
  2. Prepare the meatball mix: Combine the milk and breadcrumbs in a small bowl and set aside to soak for 5 minutes. Whisk together the egg, salt, Parmesan cheese, and parsley, then work in the ground meat, minced onions, minced garlic, and soaked breadcrumbs and milk. Use your fingers to work the mixture together; work only until all the ingredients are evenly combined.
  3. Shape the meatballs and place in slow cooker: Pinch off a few tablespoons of meatball mixture and shape into balls with your hands. Place the meatball in the sauce. Continue until all the meatballs have been shaped and transferred to the slow cooker. If the meatballs aren't quite submerged, scoop a little sauce over the top so that they're coated. (Meatballs can be prepared and kept refrigerated up to a day ahead.)
  4. Cook for 4 to 6 hours on low: The meatballs are done when no longer pink in the middle; they will likely finish cooking before 4 hours are up, but can be left to simmer.
  5. Serve the meatballs: Stir the sauce before serving — a little fat from the meatballs will rise to the top of the sauce during cooking, but can be stirred right back in. Remove the bay leaf. Serve the meatballs over cooked pasta, greens, or polenta, or in sandwiches. Leftovers will keep for 5 days or can be frozen for up to 3 months.

Recipe Notes

  • Roasting the meatballs before cooking: Roast the meatballs before cooking to render out some fat and give your sauce more roasted flavor. Roast the meatballs on a baking sheet under the broiler, turning once or twice, until they are browned on all sides.
  • Meatballs in smaller slow cookers: Halve this recipe to make in smaller slow cookers.
  • Doubling the recipe: If you have a 6-quart or larger slow cooker, you can double the recipe. It's fine if some meatballs are stacked on top of others, as long as they are all covered with sauce.


How To Make Pizza Poppers

How To Make Pizza Poppers 

How To Make Pizza Poppers


Makes 24 to 36 poppers

What You Need

Ingredients
1 ball pizza dough (about 1 pound), store-bought
1 cup tomato sauce, store-bought
2 cups shredded mozzarella cheese
1/2 pound cooked sausage, crumbled (optional)
Flour for dusting
Olive oil
Kosher salt
Equipment
Rolling pin
Bench scraper (optional)
Spoon
Baking sheet
Parchment paper

Instructions

  1. Preheat the oven: Preheat the oven to 500°F. Line a baking sheet with parchment paper and set aside.
  2. Gather the ingredients: Gather the pizza dough and bring it to room temperature, as well as the sauce, mozzarella cheese, and cooked, crumbled sausage (if using).
  3. Combine the ingredients: In a medium bowl, combine the pizza sauce, cheese, and sausage. Stir until completely mixed together.
  4. Roll out the dough: Cut the dough into workable pieces, about the size of a tennis ball. On a lightly floured work surface, roll out the dough into a long rectangle, until it's about 4 inches wide and about 1/4-inch thick.
  5. Add the filling: Down one side of the dough, drop small spoonfuls (roughly 1 teaspoon) of filling ingredients in little mounds. Leave about 1 inch between each mound of filling.
  6. Fold the dough: Fold dough over the top of the toppings and press between the mounds of filling with your fingers.
  7. Cut the dough: Using a bench scraper or sharp knife, cut each pizza bite apart from the next.
  8. Pinch the seams: Pinch the freshly cut ends together. They'll be sticky and should hold together nicely, making a neat edge. The amount of execution needed for this step will usually depend on your dough and its willingness to play nice.
  9. Brush with olive oil: Transfer the pizza bites to a baking sheet, spaced about 1-inch apart. Lightly brush the top of each pizza bite with olive oil and sprinkle with a pinch of kosher salt.
  10. Bake until golden: Bake for 8 to 10 minutes, until the tops are golden-brown. Remove from the oven, cool slightly, and serve.

Recipe Notes

  • Using store-bought pizza dough: While you can certainly use store-bought pizza dough, the dough sold in the "pop tube" does not hold up as well with this dish.
  • To freeze: Simply cook by the above directions and allow to cool completely. Freeze individually on a baking sheet lined with parchment paper. Once frozen, slide into a zip-top bag for storage. To reheat, place on a sheet pan in the oven or toaster oven to reheat at 350°F for 25 minutes (time may vary depending on oven and amount of pizza rolls being reheated).
  • Refrigeration: If they become a family favorite (like they are at our house), you can also keep a thawed bag in the refrigerator for faster reheating. They should last a solid 7 days in the the chill chest ... although we're betting they all get eaten before then.