Wednesday, 19 December 2018

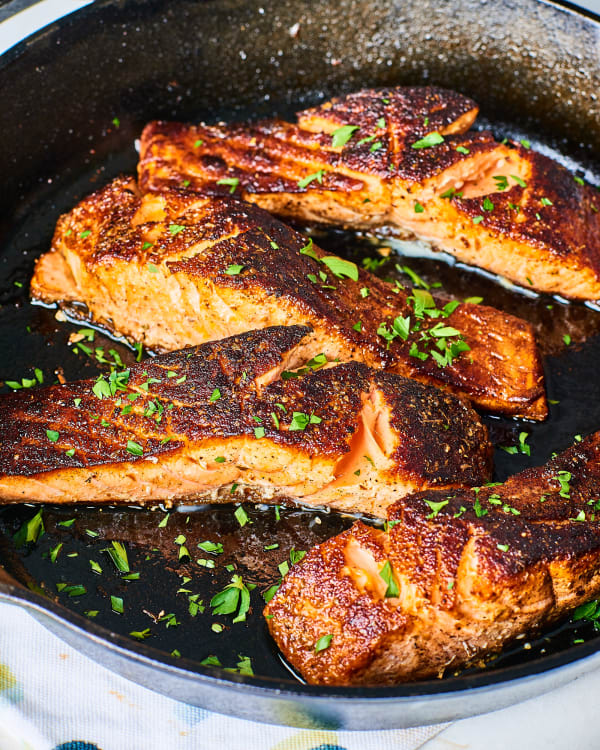
MINUTE BLACKENED SALMON

Minute Blackened Salmon

Serves 4
Prep time: 5 minutes ; cooking time: 8 minutes to 10 minutes
  • 1 tablespoon plus 1 teaspoon sweet paprika
  • 1 teaspoon garlic powder
  • 1 teaspoon dried oregano
  • 1 teaspoon kosher salt
  • 3/4 teaspoon cayenne pepper
  • 2 tablespoons olive oil
  • 4 (6-ounce) skin-on salmon fillets
  • 1 medium lemon, cut into wedges
Place the paprika, garlic powder, oregano, salt, and cayenne in a shallow bowl or plate and stir to combine. Press the flesh side of each salmon fillet into the seasoning to evenly coat it. Alternatively, you can pat the seasoning mixture evenly onto the flesh side of each salmon fillet.
Heat the oil in a large nonstick or cast iron skillet over medium until shimmering. Add the fillets, skin-side up, and cook until blackened, about 3 minutes. Flip the fillets and continue to cook until cooked through to your liking, 5 to 7 minutes depending on the thickness of your fillets. If the skin is starting to burn before the fillets are cooked, turn the heat down to medium-low. If the fillets are extra thick (1 1/2 to 2-inches thick in the middle), you may need to turn the fillets on their sides for a minute on each side to cook them through. An instant-read thermometer into the middle of the thickest fillet should register 120°F to 130°F for medium-rare or 135°F to 145°F for more well-done. Transfer the fillets to individual plates and serve with lemon wedges.

Friday, 18 March 2016

Marinara Pasta Sauce dedicated to lovely carol karendi amazing super dinner for her


How To Make Marinara Pasta Sauce


Serves 4 to 6

What You Need

Ingredients
1 tablespoon olive oil
1 small yellow onion, finely diced
2 to 3 cloves garlic, minced
1 (28-ounce) can whole peeled tomatoes
1 bay leaf
1/4 teaspoon salt
Fresh thyme, basil, oregano, or other herbs
Parmesan cheese, to garnish, optional
Cooked pasta, to serve
Equipment
Sauce pot or high-sided skillet
Spatula

Instructions

  1. Sauté the onions and garlic: Warm 1 tablespoon of olive oil over medium-high heat. Add the onions and sauté until softened and translucent, 5 to 7 minutes. Stir in the garlic and sauté until fragrant, about 30 seconds.
  2. Crush the tomatoes and add to the pan: Add the tomatoes and their juices to the pan with the onions. Crush the tomatoes in your hand as you add them, or smash them against the sides of the pan with your spatula. Alternatively, you can cut the tomatoes with kitchen shears while they're still in the pan.
  3. Add the bay leaf and fresh herbs: Add the bay leaf, salt, and fresh herbs like thyme and oregano to the pan with the sauce. If you're adding basil, wait to add it until the end of cooking.
  4. Simmer for about 20 minutes: Bring the sauce to a rapid simmer, then lower the heat to medium-low to maintain a gentle simmer. Continue simmering until the sauce is slightly reduced and thickened, about 20 minutes.
  5. Meanwhile, cook the pasta: While the sauce is simmering, cook the pasta, toss together a salad, or finish any other meal components.
  6. Serve the sauce: Remove the bay leaf and any herb stems. Serve the sauce immediately over pasta with a sprinkle of parmesan cheese. Leftovers will keep refrigerated for about a week or can be frozen for up to 3 months.

Recipe Notes

  • Dress it up! Dress up this simple sauce with a splash of red wine or balsamic vinegar, throw a few more veggies in with the onions, or cook up some ground beef or mushrooms for a more substantive sauce.


How To Cook Pork Chops in the Slow Cooker


How To Cook Pork Chops in the Slow Cooker


Makes 3 to 6 chops

What You Need

Ingredients
3 to 6 bone-in pork chops (3/4- to 1-inch thick, around 1/2 pound each) — preferably blade, shoulder, or sirloin chops; rib chops are second best
For the brine, optional:
1/2 cup kosher salt
8 cups water
Aromatics like bay leaf, whole peppercorns, and other spices
For the slow-cooker dish:
Chopped vegetables and fruits, enough to form a layer on the bottom of the slow cooker — like apples, Asian pears, onions, carrots, celery, fennel, potatoes, sauerkraut
1/4 cup cooking liquid, like broth, cider, hard cider, white wine, or water
Equipment
Shallow dish, if brining
Paper towels
Skillet, if searing your chops
Cooking utensils
6-quart or larger slow cooker

Instructions

  1. Brine your pork chops, optional: Brining seasons the meat throughout and provides some insurance against overcooking. Stir together the salt and the water until the salt dissolves. (You can also warm the water in the microwave to make this easier, but wait for the water to cool before continuing.) Place the chops in a shallow dish and pour the brine over them. The chops should be submerged; if not, make additional brine solution. Cover the dish and refrigerate for at least 15 minutes or up to 4 hours.
  2. Season with salt and pepper: If you brined your pork chops, rinse them under running water, then pat them dry with paper towels. If you didn't, just remove from their package and pat dry. Either way, season both sides with salt and pepper.
  3. Sear your chops, optional: Searing adds good flavor to the overall dish, but if you're in a rush, you can skip this step. If you do sear the meat, you can also quickly sauté the onions or other vegetables going into the dish and then deglaze the pan with the cooking liquid. Add an extra splash of the cooking liquid to the pot to compensate for the liquid that evaporated during deglazing.
  4. Add a layer of vegetables to the slow cooker: Scatter the vegetables or fruits you've chosen over the bottom of the slow cooker. They should form a single layer.
  5. Layer the chops on top: It's OK to overlap the chops slightly, but don't stack them on top of each other.
  6. Pour the cooking liquid over top: Pour the cooking liquid, or the liquid left from deglazing your pan, over the chops. If you sautéed any vegetables, tuck some of them below the chops and scatter the rest on top.
  7. Cook for 2 to 6 hours on LOW: At around 2 hours, your pork chops will be cooked through (145°F) and have a texture similar to chicken breast — tender, but firm. Between 3 to 6 hours, the chops will have a texture closer to pulled pork; it will be easy to cut with a fork and will pull easily from the bone. (The first time you make slow cooker pork chops, check the chops every so often to see how they're cooking; after this first batch, you'll know exactly how much cooking time to plan for going forward to make your ideal pork chops.)
  8. Serve with the vegetables and cooking liquid: Serve straight from the slow cooker or transfer everything to a serving dish. Spoon the cooking liquid over top of everything.

Recipe Notes

  • Leftovers: These are not my favorite chops to reheat and serve the next day; I find that they're just a bit too dry and tough at that point. If you do end up with leftovers, I recommend pulling them into shreds and using them in burritos, tacos, soups, and the like.


Slow Cooker Cranberry Pork Chops


Slow Cooker Cranberry Pork Chops


Serves 4 to 6
4 boneless pork chops, about 1/2-inch thick (2 to 3 pounds total)
2 tablespoons unsalted butter
1/2 cup chopped onion, from 1 small onion
1/4 cup chopped celery, from 1 large celery rib
1 clove garlic, minced
1 teaspoon coarse kosher salt
1 cup fresh or frozen cranberries
1/2 teaspoon dried thyme
1/4 teaspoon freshly ground black pepper
2 tablespoons brown sugar
1/4 cup chicken or vegetable broth, or white wine — added to the slow cooker
* Optional Step: Heat a large skillet over high heat and sear the pork chops for 2 minutes on each side. Immediately place them in the fridge or freezer to cool completely. (See Recipe Note and Tester's Notes for thoughts on food safety and searing ahead.)
In a large skillet, melt the butter over medium heat. Add the onion, celery, and garlic, and cook, stirring, until the vegetables are tender. Sprinkle with the salt as it cooks. Set the mixture aside to cool completely.
Place the cooled sautéed vegetables, cranberries, pork chops, pepper, thyme, and brown sugar Seal the bag, squeezing out as much air as possible. Massage the bag to distribute the ingredients evenly.

Freezing Instructions

Freeze the bag flat in the freezer for up to 3 months.

Thawing & Cooking Instructions

Thaw the pork chops on a tray or dish in the refrigerator. On the morning of the day you plan to serve this dish, empty the contents of the bag into a 4-quart slow cooker and add 1/4 cup broth or wine. Cook on LOW for 6 to 8 hours, or until the pork chops are cooked through.

Recipe Notes

  • The step of searing the pork chops is optional, as some cooks are not comfortable freezing browned meat.


Saturday, 20 February 2016

Slow Cooker Chicken Tikka Masala

\

Slow Cooker Chicken Tikka Masala


Serves 4 to 6
1 to 1 1/2 pounds boneless, skinless chicken thighs
1 large onion, diced
3 cloves garlic, minced
1-inch piece whole ginger, peeled and grated
2 tablespoons tomato paste
1 to 2 tablespoons garam masala
2 teaspoons paprika
2 teaspoons kosher salt
1 (28-ounce) can diced tomatoes
3/4 cup heavy cream or coconut milk
Fresh cilantro, chopped
2 cups cooked rice, to serve
Cut the chicken thighs into bite-sized pieces and transfer them to a 3-quart or larger slow cooker. Stir in the onion, garlic, ginger, tomato paste, 1 tablespoon of garam masala, paprika, and kosher salt until the chicken is evenly covered with spices. Stir in the diced tomatoes with their juices.
→ If you have the time: Marinate the chicken in 1/2 cup yogurt for up to 6 hours. Shake to remove excess yogurt before transferring to the slow cooker.
→ If you have the time: Sauté the onions and garlic in a little olive oil over medium-high heat in a skillet until softened, then stir in the ginger, tomato paste, and spices until fragrant. Transfer to the slow cooker with the chicken and diced tomatoes. This will give your tikka masala more depth of flavor.

Cover the slow cooker and cook for 4 hours on high or 8 hours on low. Fifteen minutes before the end of cooking, stir in the heavy cream. If you prefer a thicker sauce, leave the slow cooker uncovered for the last 15 minutes. Taste and add more garam masala or salt to taste.
Serve over rice with fresh cilantro sprinkled over the top of each serving. The tikka masala can be refrigerated for 3 to 4 days or frozen for 3 to 4 months.

Recipe Notes

  • Chicken breasts can be substituted for the thighs, though I find thighs hold up better over the long cooking and breasts tend to fall into shreds. Still delicious, though!
  • For a little of that smoky, tandoori flavor, try using smoked paprika and roasted tomatoes.
  • Here's my favorite method for cooking basmati rice in about 20 minutes:


How To Make Meatballs in the Slow Cooker

Slow Cooker Meatballs 

How To Make Meatballs in the Slow Cooker


Serves 4 to 6

What You Need

Ingredients

For the tomato sauce:
1 28-ounce can crushed tomatoes
1/2 large yellow onion, chopped small
1/2 teaspoon salt
1 bay leaf
For the meatballs:
1/2 cup whole or 2% milk
1/2 cup breadcrumbs or panko crumbs
1 large egg
1 teaspoon salt
1/2 cup grated Parmesan cheese
1/4 cup parsley, finely chopped
1 pound ground beef, pork, lamb, or a mix
1/2 large yellow onion, chopped small
1 clove garlic, minced
Equipment
6-quart slow cooker or larger

Instructions

  1. Make the sauce: Combine the crushed tomatoes, onions, salt, and bay leaf in the bowl of the slow cooker. Stir to combine.
  2. Prepare the meatball mix: Combine the milk and breadcrumbs in a small bowl and set aside to soak for 5 minutes. Whisk together the egg, salt, Parmesan cheese, and parsley, then work in the ground meat, minced onions, minced garlic, and soaked breadcrumbs and milk. Use your fingers to work the mixture together; work only until all the ingredients are evenly combined.
  3. Shape the meatballs and place in slow cooker: Pinch off a few tablespoons of meatball mixture and shape into balls with your hands. Place the meatball in the sauce. Continue until all the meatballs have been shaped and transferred to the slow cooker. If the meatballs aren't quite submerged, scoop a little sauce over the top so that they're coated. (Meatballs can be prepared and kept refrigerated up to a day ahead.)
  4. Cook for 4 to 6 hours on low: The meatballs are done when no longer pink in the middle; they will likely finish cooking before 4 hours are up, but can be left to simmer.
  5. Serve the meatballs: Stir the sauce before serving — a little fat from the meatballs will rise to the top of the sauce during cooking, but can be stirred right back in. Remove the bay leaf. Serve the meatballs over cooked pasta, greens, or polenta, or in sandwiches. Leftovers will keep for 5 days or can be frozen for up to 3 months.

Recipe Notes

  • Roasting the meatballs before cooking: Roast the meatballs before cooking to render out some fat and give your sauce more roasted flavor. Roast the meatballs on a baking sheet under the broiler, turning once or twice, until they are browned on all sides.
  • Meatballs in smaller slow cookers: Halve this recipe to make in smaller slow cookers.
  • Doubling the recipe: If you have a 6-quart or larger slow cooker, you can double the recipe. It's fine if some meatballs are stacked on top of others, as long as they are all covered with sauce.


How To Make Pizza Poppers

How To Make Pizza Poppers 

How To Make Pizza Poppers


Makes 24 to 36 poppers

What You Need

Ingredients
1 ball pizza dough (about 1 pound), store-bought
1 cup tomato sauce, store-bought
2 cups shredded mozzarella cheese
1/2 pound cooked sausage, crumbled (optional)
Flour for dusting
Olive oil
Kosher salt
Equipment
Rolling pin
Bench scraper (optional)
Spoon
Baking sheet
Parchment paper

Instructions

  1. Preheat the oven: Preheat the oven to 500°F. Line a baking sheet with parchment paper and set aside.
  2. Gather the ingredients: Gather the pizza dough and bring it to room temperature, as well as the sauce, mozzarella cheese, and cooked, crumbled sausage (if using).
  3. Combine the ingredients: In a medium bowl, combine the pizza sauce, cheese, and sausage. Stir until completely mixed together.
  4. Roll out the dough: Cut the dough into workable pieces, about the size of a tennis ball. On a lightly floured work surface, roll out the dough into a long rectangle, until it's about 4 inches wide and about 1/4-inch thick.
  5. Add the filling: Down one side of the dough, drop small spoonfuls (roughly 1 teaspoon) of filling ingredients in little mounds. Leave about 1 inch between each mound of filling.
  6. Fold the dough: Fold dough over the top of the toppings and press between the mounds of filling with your fingers.
  7. Cut the dough: Using a bench scraper or sharp knife, cut each pizza bite apart from the next.
  8. Pinch the seams: Pinch the freshly cut ends together. They'll be sticky and should hold together nicely, making a neat edge. The amount of execution needed for this step will usually depend on your dough and its willingness to play nice.
  9. Brush with olive oil: Transfer the pizza bites to a baking sheet, spaced about 1-inch apart. Lightly brush the top of each pizza bite with olive oil and sprinkle with a pinch of kosher salt.
  10. Bake until golden: Bake for 8 to 10 minutes, until the tops are golden-brown. Remove from the oven, cool slightly, and serve.

Recipe Notes

  • Using store-bought pizza dough: While you can certainly use store-bought pizza dough, the dough sold in the "pop tube" does not hold up as well with this dish.
  • To freeze: Simply cook by the above directions and allow to cool completely. Freeze individually on a baking sheet lined with parchment paper. Once frozen, slide into a zip-top bag for storage. To reheat, place on a sheet pan in the oven or toaster oven to reheat at 350°F for 25 minutes (time may vary depending on oven and amount of pizza rolls being reheated).
  • Refrigeration: If they become a family favorite (like they are at our house), you can also keep a thawed bag in the refrigerator for faster reheating. They should last a solid 7 days in the the chill chest ... although we're betting they all get eaten before then.


How To Make Pizza at Home


How To Make Pizza at Home

Makes two 10-inch pizzas

What You Need

Ingredients
1 pound pizza dough, store-bought or homemade
1/2 to 1 cup sauce: tomato sauce, white sauce, or other spread
2 to 3 cups other toppings: sautéed onions, sautéed mushrooms, pepperoni, cooked sausage, cooked bacon, diced peppers, leftover veggies, or any other favorite toppings
1 to 2 cups (8 to 16 ounces) cheese, shredded or sliced: mozzarella, Monterey Jack, provolone, fontina, or any other favorite.
Cornmeal or flour (optional)
Equipment
Pizza stone or baking sheet
Pizza peel or baking sheet
Parchment paper (optional)

Instructions

1. Heat the oven to 550°F or higher: Don't be afraid to really crank the heat up to its highest setting. The high heat will help make a crunchier and more flavorful crust. Let the oven heat for at least half an hour before baking your pizzas. If you have a baking stone, place it in the lower-middle of your oven.
2. Divide the dough in half: One pound of dough makes two 10-inch pizzas. Slice the dough in half and cover one half with an upside-down bowl or a clean kitchen towel while you prepare the first pizza.
3. Roll out the dough:
Method #1: Pizza Baked on Parchment: Tear off a large piece of parchment paper roughly 12 inches wide. Working with one piece of the dough at a time, form it into a large disk with your hands and lay it on the parchment paper. Use your hands or a rolling pin to flatten the dough until it is 1/4-inch thick or less. If the dough starts to shrink back, let it rest for 5 minutes and then continue rolling.
Method #2: Pizza with Cornmeal or Flour and a Baking Stone: Sprinkle a handful of cornmeal or flour on a pizza peel or the back of a baking sheet. Working with one piece of the dough at a time, form it into a large disk with your hands and lay it on the peel. Use your hands or a rolling pin to flatten the dough until it is 1/4-inch thick or less. Shake the peel or baking sheet frequently as you shape to make sure the dough isn't sticking. If the dough starts to shrink back, let it rest for 5 minutes and then continue rolling.
Method #3: Pizza Baked on a Baking Sheet: Brush a thin film of olive oil on a baking sheet. Working with one piece of the dough at a time, form it into a large disk with your hands and lay it on the baking sheet. Use your hands or a rolling pin to flatten the dough until it is 1/4-inch thick or less. If the dough starts to shrink back, let it rest for 5 minutes and then continue rolling.
4. Top the pizza: Spoon a few tablespoons of sauce into the center of the pizza and use the back of a spoon to spread it out to the edges. Pile on all of your toppings.
5. Bake the pizza: Using a pizza peel or the back side of a baking sheet, slide your pizza (with the parchment or with the cornmeal) onto the baking stone. If you don't have a baking stone, bake the pizza right on the baking sheet. Cook for 5 minutes, then rotate the pizza. Slide the parchment out from under the pizza, if used. Bake for another 3 to 5 minutes, until the crust is golden-brown and the cheese looks toasty.
6. Slice and serve: Let the pizza cool slightly on a cooling rack, just until you're able to handle it. Slice it into pieces and serve.


How To Make Bacon-Wrapped Dates


How To Make Bacon-Wrapped Dates


Makes 20 to 24 bites

What You Need

Ingredients
20 to 24 Medjool dates (12 to 16 ounces)
4 ounces goat cheese or blue cheese
12 to 16 ounces bacon, preferably of medium thickness
20 to 24 toasted almonds, optional
Equipment
Baking sheet
Parchment or nonstick baking liner
Paring knife
Soup spoon
Toothpicks
Paper towels

Instructions

  1. Heat the oven to 400°F. Line a baking sheet with parchment or a baking liner and set aside.
  2. Cut open the dates: Use a paring knife to cut a slit in the side of the date. Use your thumbs to open the date slightly. Remove the pits if your dates still have them inside.
  3. Stuff with goat cheese: Use a spoon to stuff a little goat cheese or blue cheese into each date. Use the back of the spoon to press the cheese into the date. If you're adding almonds, press an almond or two into the cheese. Press the date closed.
  4. Wrap the dates with bacon: Cut the strips of bacon in half. Wrap each date with a half-strip of bacon. Secure the end of the bacon with a toothpick.
  5. Arrange the dates on the baking sheet: Space the dates a little apart and lay them on one side.
  6. Bake for 15 minutes. After 15 minutes, flip the dates to the other side.
  7. Continue baking for another 15 to 20 minutes: Keep an eye on the dates and remove from the oven as soon as the bacon is as crispy as you like it.
  8. Transfer the dates to a plate with a paper towel to drain. If the dates seem greasy, blot the sides as well as the bottoms.
  9. Serve warm or room temperature.

Recipe Notes

  • The dates can be prepped and refrigerated for up to a day before baking. Keep covered.
  • Recipe can be doubled or tripled as needed.


How To Make Perfect Bacon in the Oven


How To Make Perfect Bacon in the Oven

What You Need

Ingredients
1 to 2 pounds bacon
Equipment
Aluminum foil
Baking sheet(s)
Tongs
Paper towels
Platter

Instructions

  1. Preheat the oven to 400°F: Turn on the oven and preheat to 400°F. Place a rack in the lower third of the oven. If you're cooking multiple sheets of bacon, position a second rack in the top third of the oven.
  2. Arrange the bacon on a baking sheet: Line a baking sheet with foil (this makes cleanup easier). Lay the bacon on the baking sheet in a single layer. The bacon can be close together, but don't let it overlap or the bacon will stick during cooking. If necessary, use a second baking sheet.
  3. Bake the bacon: Place the baking sheet of bacon in the oven and bake until the bacon is deep golden-brown and crispy, 15 to 20 minutes. Exact baking time will depend on the thickness of the bacon and how crispy you like it. Begin checking around 12 minutes to monitor how quickly the bacon is cooking. The bacon fat will sputter and bubble as the bacon cooks, but shouldn't splatter the way it does on the stove top. Pour off the bacon grease as needed so the bacon isn't totally submerged in grease.
  4. Transfer the bacon to a plate lined with paper towels: Remove the bacon from the oven and use tongs to transfer it to a plate lined with paper towels to drain and finish crisping. Serve immediately. You can also refrigerate leftover bacon for a week or freeze it for up to 3 months; warm the bacon in the microwave before serving.
  5. Clean up: If you want to save the bacon grease, let it cool slightly, then pour it into a container and refrigerate. If you don't want to save the grease, let it solidify on the baking sheet, then crumple the foil around it and discard.

Recipe Notes

  • Even crispier bacon: For even crispier bacon, set a metal cooling rack over the foil-lined baking sheet and lay the raw bacon over the cooling rack. Elevating the bacon allows it to cook from all sides and become extra-crispy.


Chicken Pot Pie with Biscuit Topping


Chicken Pot Pie with Biscuit Topping

Serves 6
For the filling
3 tablespoons olive oil
1 large leek, chopped
1 cup chopped onions, small dice
1 cup chopped carrots, small dice
1 1/2 cups green beans, cut into 3/4-inch pieces
4 tablespoons butter
1/2 cup all-purpose flour
2 cups hot chicken stock, preferably reserved from cooked chicken
1 cup whole milk, warmed
2 teaspoons dry sherry
1 teaspoon sugar
3 cups cooked, shredded chicken (see note)
3 hard boiled eggs, peeled and sliced
Kosher salt and freshly ground pepper
For the topping
1 1/2 cups all-purpose flour
1 1/2 teaspoons baking powder
1 1/2 teaspoons kosher salt
1 stick unsalted butter, melted
1 1/2 cups whole or 2% milk
Preheat oven to 425°F.
For the filling, heat the olive oil in a large Dutch oven or heavy pot on medium heat. Add the leeks, onions, and carrots and sauté until the vegetables are tender, about 10-15 minutes. Meanwhile, cook the green beans in a pot of salted boiling water until tender and bright green, about 5-7 minutes (see note). Drain the beans and set aside.Transfer the sautéed vegetables to the same bowl as the green beans, season with salt, and set aside.
Melt the butter in the Dutch oven over medium heat. Add the flour and cook until a thick paste forms. Continue stirring for a minute or so. Add the chicken stock and milk and cook, whisking constantly until thickened, about 3-5 minutes. Stir in the sherry, sugar, and salt and pepper to taste. Fold in the vegetables and cooked chicken into the cream sauce. Season generously with salt and pepper. (Seriously, don't go light on the salt here, but taste as you go.) Pour the filling into a 2- to 3-quart greased casserole dish. Arrange the boiled egg slices over the top.
For the topping, stir together the flour, baking powder, and salt in a mixing bowl. Add the melted butter and milk, and whisk until combined. (Just a warning, the batter will seem fairly runny. That's okay.) Pour the batter evenly over the casserole dish.
Bake the pot pie for 45 minutes, until the biscuit topping is light golden brown. Remove from the oven and allow to cool for 10 minutes before serving.

Notes:

• I poached 4 pounds of bone-in chicken thighs with aromatics--carrots, celery, onions--until cooked through. I shredded the chicken and used the stock for the pot pie. (I also added the remaining bones and extra chicken back to the pot with more water to make additional stock for using later.)
• For extra flavor, blanch the green beans in the reserved stock from poaching the chicken instead of boiling water.


Tuesday, 12 January 2016

Cranberry Mors

Cranberry Mors 


Cranberry Mors

Makes about 1 quart (940 ml)
2 cups (224 grams) cranberries
5 cups (1175 milliliters) water
1/3 cup (113 grams) honey, or more to taste
Juice of 1/2 lemon (about 1 tablespoon, or 15 milliliters)
Rinse and pick over the cranberries, discarding any stems or leaves.
Combine the cranberries and water in a large saucepan. Bring to a boil and cook until the cranberries burst. Remove from the heat.
Using a potato masher or the back of a large wooden spoon, thoroughly mash the cranberries in the pot. Return the pot to a boil and boil for 5 minutes. Remove from the heat. Stir in the honey and lemon juice.
Cover and let cool to room temperature. Strain through a fine-mesh strainer into a container; discard the pulp, or better yet, reserve it for another use.

Monday, 11 January 2016

Crunchy kenyan Slaw with Ginger-Tahini Dressing


Crunchy kenyan Slaw with Ginger-Tahini Dressing


Serves 4
For the Ginger-Tahini Dressing:
3 scallions, white and light green parts only, minced
1/4 cup low sodium tamari or soy sauce
1/4 cup water
2 tablespoons tahini
1 tablespoon fresh lime juice
1 tablespoon rice wine vinegar
1 tablespoon pure maple syrup
1 1/2 tablespoon freshly grated ginger
1/2 teaspoon crushed red pepper flakes
For the salad:
2 cups shredded red cabbage
1/2 cup shredded napa cabbage
2 carrots, coarsely grated
1 medium-sized beet, coarsely grated
1 cup cilantro, finely chopped
1 jalapeño pepper, seeded and cut into thin slivers
1 cup cooked, shelled edamame
1/2 cup peanuts
1/2 cup raisins
2 tablespoons sesame seeds
Prepare the dressing by whisking all of the ingredients together until smooth and well-combined. This works best with an immersion blender but a hand whisk is fine too. Taste the dressing and adjust seasonings if needed.
Place the red cabbage, Napa cabbage, carrots, beets, edemame, cilantro and jalapeño in a large bowl. Stir to combine. Pour the dressing over the cabbage mixture and toss until everything is evenly coated. Add the peanuts, raisins, and sesame seeds. Serve chilled or at room temperature.


Thursday, 31 December 2015

FOOD CREATIVITY: White Wine, Clementine & Vanilla Pitcher Cocktail

FOOD CREATIVITY: White Wine, Clementine & Vanilla Pitcher Cocktail:   White Wine, Clementine & Vanilla Pitcher Cocktail Serves 8 to 12 For the thyme syrup: 1/2 cup cane sugar ...

How to Cook Ribs in the Oven


How to Cook Ribs in the Oven

Serves 6 to 8

What You Need

Ingredients
4 to 5 pounds spare ribs or baby back ribs
1/4 cup Dijon mustard
2 teaspoons liquid smoke (optional)
1 cup spice rub, like
1 cup barbecue sauce, store-bought o
Equipment
Baking sheet
Aluminum foil
Wire cooling rack
Pastry Brush
Knife

Instructions

  1. Prepare the baking sheet: Line a baking sheet with aluminum foil and set a cooling rack on top. Lay the ribs on top of the rack in a single layer. This arrangement allows for heat circulations on all sides of the ribs.
  2. Season the ribs: Mix the mustard and the liquid smoke, if using, and brush the ribs on both sides. Sprinkle the ribs with the dry rub and pat gently to make sure the rub adheres to the rib meat. Note: This step can be done the day ahead for a deeper flavor. Wrap the seasoned ribs in plastic wrap and refrigerate.
  3. Broil the ribs: Heat the broiler and place an oven rack a few inches below the heating element. Make sure the meaty side of the ribs is facing up. Broil the ribs for about 5 minutes, until the sugar in the dry rub is bubbling and the ribs are evenly browned.
  4. Bake the ribs: Set the oven to 300°F. Move the ribs to an oven rack in the middle of the oven. Roast for 2 1/2 to 3 hours for spare ribs or 1 1/2 to 2 hours for baby back ribs. Halfway through cooking, cover the ribs with aluminum foil to protect them from drying out.
  5. Brush with barbecue sauce: About 30 minutes before the end of cooking, brush the ribs with barbecue sauce, re-cover with foil, and finish cooking.
  6. Rest the ribs and serve: The ribs are done when a knife slides easily into the thickest part of the rib meat. Let them rest, covered, for about 10 minutes, and then cut between the bones to separate the individual ribs. Serve immediately with extra barbecue sauce for dipping.

How To Make Meatballs

How to Make Meatballs

How To Make Meatballs


Makes about 28 meatballs

What You Need

Ingredients
1/2 cup milk (whole, 2%, or skim)
1/2 cup fine breadcrumbs
1 large egg
1 teaspoon salt
Freshly ground black pepper
1/2 cup grated Parmesan cheese
1/4 cup finely minced Italian parsley
1 pound ground meat such as beef, pork, turkey, chicken, or veal, or a mix
1/2 cup finely chopped onion (or grated on a coarse grater) from 1 small yellow onion
1 clove garlic, finely minced
Tools
Small mixing bowl
Large mixing bowl
Knife
Cutting board
Grater
Baking sheet
Oven

Instructions

  1. Combine the milk and breadcrumbs: Pour the milk over the breadcrumbs in a small bowl and set aside while preparing the rest of the meatball mix. The breadcrumbs will absorb the milk and become soggy.
  2. Whisk the egg, salt, pepper, Parmesan, and parsley: Whisk the egg in a large bowl until blended. Whisk in the salt and a generous quantity of black pepper, then whisk in the Parmesan and parsley.
  3. Combine the egg and ground meat: Add the meat to the egg mixture. Use your hands to thoroughly mix the egg into the ground meat.
  4. Add the onions and soaked breadcrumbs: Add the onions, garlic, and soaked breadcrumbs to the meat. Mix them thoroughly into the meat with your fingers. Try not to overwork the meat; pinch the meat between your fingers rather than kneading it.
  5. Form the meat into meat balls: Pinch off a piece of the meat mixture and gently roll between your hands to form 1 1/2-inch meatballs. Continue shaping until all the meat is used.
  6. To roast the meatballs in the oven: Arrange the meatballs spaced slightly apart on a baking sheet. Cook under the broiler for 20 to 25 minutes or bake at 400°F for 25 to 30 minutes. (Watch closely if cooking meatballs made with lean meat.) The meatballs are done when cooked through and the outsides are browned, and when they register 165°F in the middle on an instant read thermometer. Serve immediately.
  7. To cook the meatballs in sauce: Bring a marinara sauce or other pasta sauce to a simmer and add as many meatballs as will fit comfortably in the pan. Cover and simmer for 30 to 35 minutes. The meatballs are done when they're cooked through and register 165°F in the middle on an instant read thermometer. Serve immediately.

How To Cook Salmon in the Oven


How To Cook Salmon in the Oven

What You Need

Ingredients
1 to 3 pounds skin-on salmon fillets (8 ounces per person)
Olive oil
Salt
Pepper
Lemon wedges, to serve
Equipment
Roasting pan or baking sheet
Aluminum foil

Instructions

  1. Preheat the oven to 425°F: Heat the oven to 425°F with a rack placed in the middle. Line a roasting pan or baking sheet with foil.
  2. Pat the salmon dry: Pat the salmon dry with a paper towel.
  3. Rub the salmon with oil, salt, and pepper: Drizzle some oil over the top of each salmon — just enough to coat the salmon — and rub it over the salmon with your fingers or a pastry brush. Sprinkle the salmon generously with salt and pepper.
  4. Place the salmon in the roasting pan: Place the salmon in the roasting pan, skin-side down. Transfer to the oven.
  5. Roast for 4 to 6 minutes per half-inch thickness of salmon: Roasting time depends on the thickness of your salmon, as determined by the thickest part of the salmon fillet. For every half-inch of salmon, roast 4 to 6 minutes — 4 minutes will give you salmon that is still a touch rare, 6 minutes will thoroughly cook it.
  6. Salmon is done when easily flaked: You can also check the doneness of your salmon with a fork. When the salmon flakes easily with a fork, it's ready. If you like, you can use an instant read thermometer to check the fish for doneness. The USDA recommends a minimum internal temperature of 145°F, which should be measured at the thickest part of the fillet.
  7. Serve immediately: Enjoy your salmon immediately. Leftovers will keep refrigerated for about 5 days, and can be gently reheated in the microwave or used cold

How To Cook a Frozen Turkey


How To Cook a Frozen Turkey


Makes 1 turkey

What You Need

Ingredients
1 frozen or partially thawed turkey
Melted butter
Salt
Pepper
Equipment
Roasting pan
Roasting rack
Pastry brush

Estimated Cooking Times for Frozen Turkeys

  • 8- to 12-pound turkey: 4 to 4 1/2 hours
  • 12- to 14-pound turkey: 4 1/2 to 5 3/4 hours
  • 14- to 18-pound turkey: 5 3/4 to 6 1/4 hours
  • 18- to 20-pound turkey: 6 1/4 to 6 3/4 hours
  • 20- to 24-pound turkey: 6 3/4 to 7 1/2 hours
Partially thawed turkeys will have shorter cooking times.

Instructions

  1. Heat the oven to 325°F. Place a rack in the bottom third of the oven.
  2. Place the turkey in the roasting pan: Unwrap the turkey and place it on top of a roasting rack inside a roasting pan. Don't try to remove the giblets or season the turkey right now.
  3. Roast for 2 1/2 hours. Try not to open the oven door or let out too much heat. After 2 1/2 hours, your turkey should just be starting to turn golden.
  4. Check the temperature: This temperature check is just to get a reference point for how quickly the turkey is cooking. At this point, the breast and thighs will likely be in the low-100°F range.
  5. Remove the giblets: The turkey should be thawed enough at this point that you can remove any trussing mechanisms (although most are safe for roasting in the oven; check the turkey's packaging for information). Check the neck cavity and remove the bag of giblets if you see it. Check the cavity of the turkey for the neck or giblets, and remove them if you can. If you can't get to the giblets, or if the giblets are still frozen inside the turkey's cavity, continue roasting, but check every 30 minutes to see if you can remove the giblets. Be careful — the turkey is still mostly frozen, but the juices around the surface are hot.
  6. Tuck the wings behind the turkey: You can also leave them untucked — either way is fine.
  7. Season the turkey: Brush the turkey with melted butter. Sprinkle with salt, pepper, and any other seasonings you'd like to use. Rub in the spices with your fingers.
  8. Tip the turkey to pour out any juices: Juices tend to collect inside the cavity of the turkey as they melt. Lift the roasting rack and tilt the turkey so these juices pour out into the pan.
  9. Continue roasting: Refer to the chart above for estimated total roasting times. Check the temperature in the breast and thigh meat every hour or so to gauge how fast it's cooking, and tilt the pan to pour out any juices. Brush the turkey with more butter if you'd like. If the skin over the breasts is browning more than you like, cover loosely with foil. If the pan starts looking very dry or if the drippings start looking burnt, add a few cups of water or broth.
  10. Cook until the turkey registers at least 165°F in all areas: The breast meat is the thickest part of the turkey and will cook the slowest. The middle of the turkey, closest to the bone, will also be the last to cook through; the temperature may be well above 165°F close to the surface, but below temperature deeper in the meat. Make sure you take the temperature in multiple places and also at multiple depths in the meat to be sure you're getting an accurate temperature reading throughout. (Just be sure not to hit the bone, which will give you a false temperature.)
  11. Rest the turkey for 30 minutes.
  12. Carve the turkey and serve.

How To Cook Turkey Breast


How To Cook Turkey Breast


Serves 4 or more

What You Need

Ingredients
3 to 7 pounds thawed, bone-in, skin-on turkey breast (1 half-breast or 1 whole turkey breast joined at the breast bone)
1 tablespoon butter or extra-virgin olive oil
1 tablespoon kosher salt
1/2 teaspoon black pepper
Equipment
Roasting pan, oven-proof skillet, or other baking dish large enough to hold the whole breast
Roasting rack, or thick-cut vegetables to lift the breast off the pan
Measuring spoons
Aluminum foil
Instructions
  1. Let the turkey breast warm: Transfer the turkey breast to the rack inside a roasting pan, or place on top of vegetables in a skillet or other baking dish. Let the breast warm on the counter while the oven heats.
  2. Preheat the oven to 450°F. Place an oven rack in the bottom third of the oven.
  3. Rub the turkey breast with butter and seasonings: Pat the skin of the turkey breast dry with a paper towel. Rub the turkey breast all over with butter. If desired, loosen the skin and rub some butter into the meat under the skin as well. Sprinkle the breast all over with salt and pepper (with some under the skin, if desired). Rub the seasonings into the skin. If you're cooking a half-breast, pull the skin to cover the meat as much as possible.
  4. Lower the oven to 350°F and roast the turkey for 1 hour: Place the turkey in the oven and immediately lower the heat to 350°F. Roast for 1 hour, then begin checking the temperature.
  5. Check the turkey's temperature: The turkey is done when it reaches 165°F in the thickest part of the breast meat. Start checking after 1 hour of roasting and continue checking every 10 to 15 minutes until the breast is cooked through.
  6. Cover the turkey to prevent over-browning: If the skin over the breast meat begins to brown too darkly toward the end of cooking, cover it with aluminum foil to prevent scorching.
  7. Rest the turkey: When cooked, remove the turkey from the oven and cover it loosely with foil. Rest the turkey for 15 to 20 minutes; this gives the juices time to redistribute and the turkey time to firm up. (Pour the drippings and juices from the pan into a measuring cup for making gravy!)
  8. Carve the turkey: Carve the turkey beginning at the breast bone. Continue carving, keeping your knife as close to the ribs as possible, until the whole breast is carved from the bone; some meat will still be left on the bone. Once no longer attached to the bone, slice the breast crosswise into slices.

How To Cook a Turkey for Thanksgiving


How To Cook a Turkey for Thanksgiving


Makes 1 turkey

What You Need

Ingredients
1 turkey, any size
2 cups chicken broth, vegetable broth, water, or other liquid
1 cup unsalted butter, melted, for basting (optional)
Equipment
Roasting pan
Roasting rack (or something  off the pan)
Turkey baster, brush, or ladle (optional, if basting)

Instructions

  1. Prepare the turkey for roasting: Thirty minutes to an hour before roasting, take the turkey out of the fridge. Remove any packaging and the bag of giblets (check in the body cavity and in the neck cavity). Set the turkey breast-side up on the roasting rack and let it sit while the oven preheats. This takes the chill off the meat, which helps the meat cook faster and more evenly. It also gives the skin time to dry out, which promotes browning and crisping. (Note: Your turkey will likely still feel cool to the touch after sitting at room temperature — that's fine and you can continue on with roasting.)
  2. Preheat the oven to 450°F: Position an oven rack in the bottom third of your oven and preheat the oven to 450°F. If you brined your turkey, as we did, no need to do anything now. If your turkey is straight out of the package, rub it with some salt and pepper before putting it in the oven. We recommend leaving your turkey un-stuffed and un-trussed, both because it's easier and because the turkey will cook more evenly.
  3. Add liquid to the roasting pan: When ready to roast, pour two cups of broth or water into the roasting pan.
  4. Place the turkey in the oven and turn down the heat: Place the turkey in the oven and turn down the heat to 350°F. We recommend roasting turkeys breast-side up. Some people like starting the turkey breast-side down to shield the breast meat, but the idea of flipping a hot, sputtering turkey is not our idea of a good time. Instead, we prefer to simply shield the breast meat with foil toward the end of cooking if it starts getting too browned.
  5. Roast the turkey: The rule of thumb for cooking a turkey is 13 minutes per pound. So our 16-pound turkey was estimated to cook in about 3 1/2 hours. However, some factors like brining the bird, cooking with an empty (un-stuffed) cavity, and leaving the legs un-trussed will contribute to much faster cooking. Plan on the 13-minute-per-pound rule, but start checking the temperature of your turkey about halfway through the scheduled cooking time to gauge how fast it's cooking.
  6. Baste the turkey every 45 minutes: Every 45 minutes, remove the turkey from the oven, close the oven door (don't let that heat out!), and baste the turkey all over. To baste, tilt the pan and use a turkey baster or spoon to scoop up the pan liquids and drizzle them on top of the turkey. Basting with pan juices cools the surface of the turkey and slows down cooking, which in turn keeps the breast meat cooking at close to the same rate as the legs and thighs. In the last 45 minutes or so of cooking, you can also baste the turkey with melted butter or oil. This helps crisp up the skin and turn it a beautiful deep golden brown.
  7. Check the turkey's temperature: Begin checking the turkey's temperature about halfway through the estimated cooking time. Check the temperature in three places: the breast, outer thigh, and inside thigh . In every case, the meat should be at least 165°F when the turkey has finished cooking. If any place is under that temperature, put the turkey back in the oven for another 20 minutes. Shield the breast meat with foil if needed to keep it from overcooking.
  8. Rest the turkey before carving: Grab one side of the roasting rack with an oven mitt and tilt the whole pan so the liquids inside the turkey cavity run out into the pan. (These juices are used to make the gravy.) Then, lift the whole turkey (still on the rack) and transfer it to a cutting board. Tent the turkey with aluminum foil and let it rest for at least 30 minutes. This gives time for the meat to firm up and the juices to be re-absorbed into the muscle tissue, making the turkey easier to slice and taste juicier.
  9. Carve the turkey: Carve the turkey the same way you would for a walk-through of the process. Remove the wings first, then the thighs, then the breast meat. Once you have the meat off, you can separate the thighs into thighs and drumsticks and carve the breast meat into individual slices.
  10. Don't forget about the leftovers: One final note! Once you've sat down at the table, don't forget about the turkey back on the counter. The leftover meat needs to be refrigerated within two hours of cooking, after which the risk of something nasty taking up residence starts to increase exponentially. Be safe!